
 myCSUSM


Microsoft Teams Guide
What Can Teams Do?
Teams allows for instant text messaging, voice and video calling, file storing, sharing, and collaborative editing, and more.
It is currently used across campus as a communication tool as well for virtual support (advising, tutoring, etc.) and virtual engagement (student centers and orgs).
It can also provide a virtual classroom for both synchronous and asynchronous instruction as well as a space for collaborative student projects and student group work.
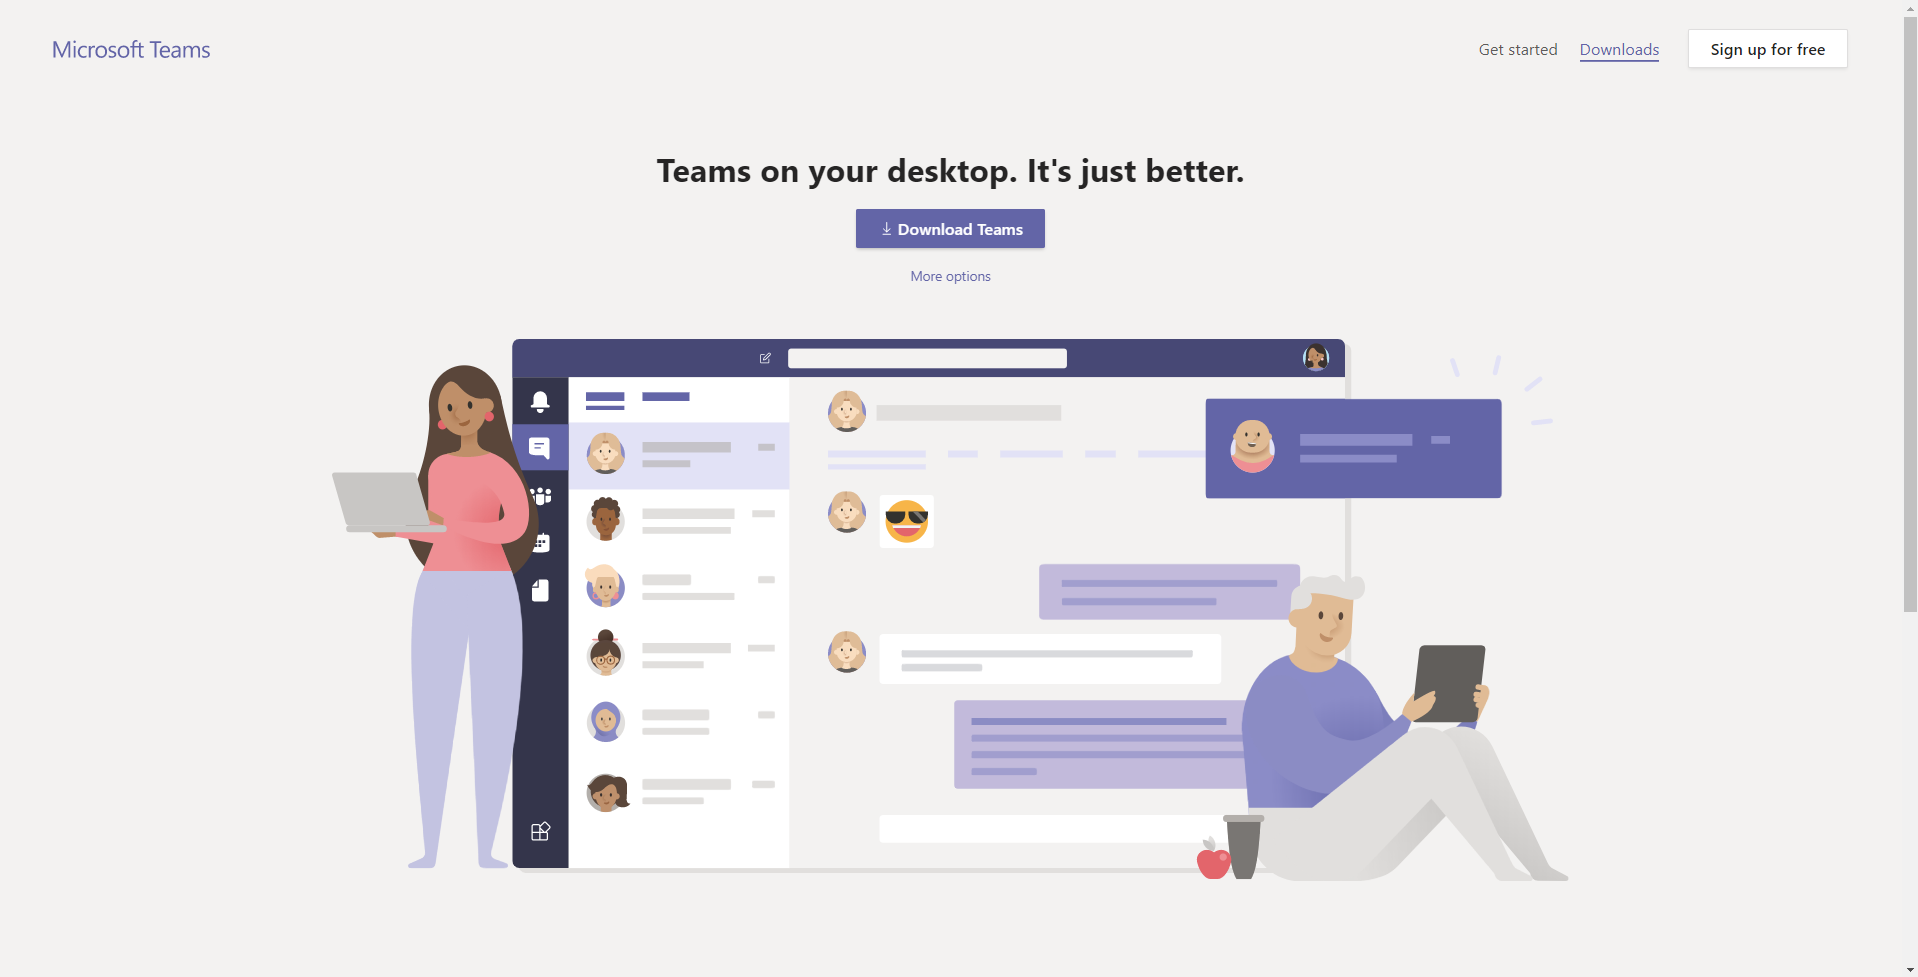
Downloading and Logging Into Teams
- Downloading Teams on desktop or mobile & Logging In
To download the Teams desktop app:
- Visit the Teams download page and click on Download Teams.
2. Install the app and then launch it
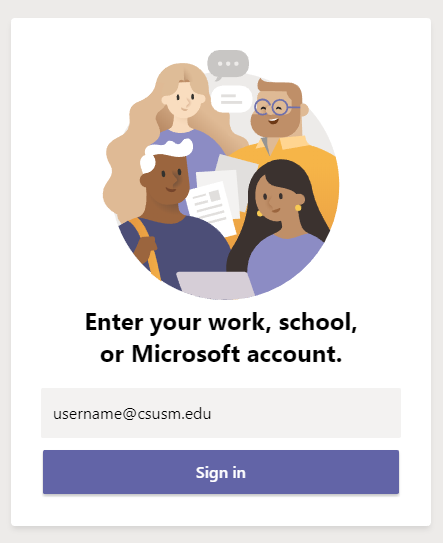
3. Sign in with your campus credentials
- NOTE: Students sign in by using username@csusm.edu, without the Cougars part of your email address (example: dorie002@csusm.edu, NOT dorie002@cougars.csusm.edu)
You can also download the Microsoft Teams phone app for free on iOS and Android.
In-App Help
The best help resource for Teams is in the app itself, so that should be your first destination.
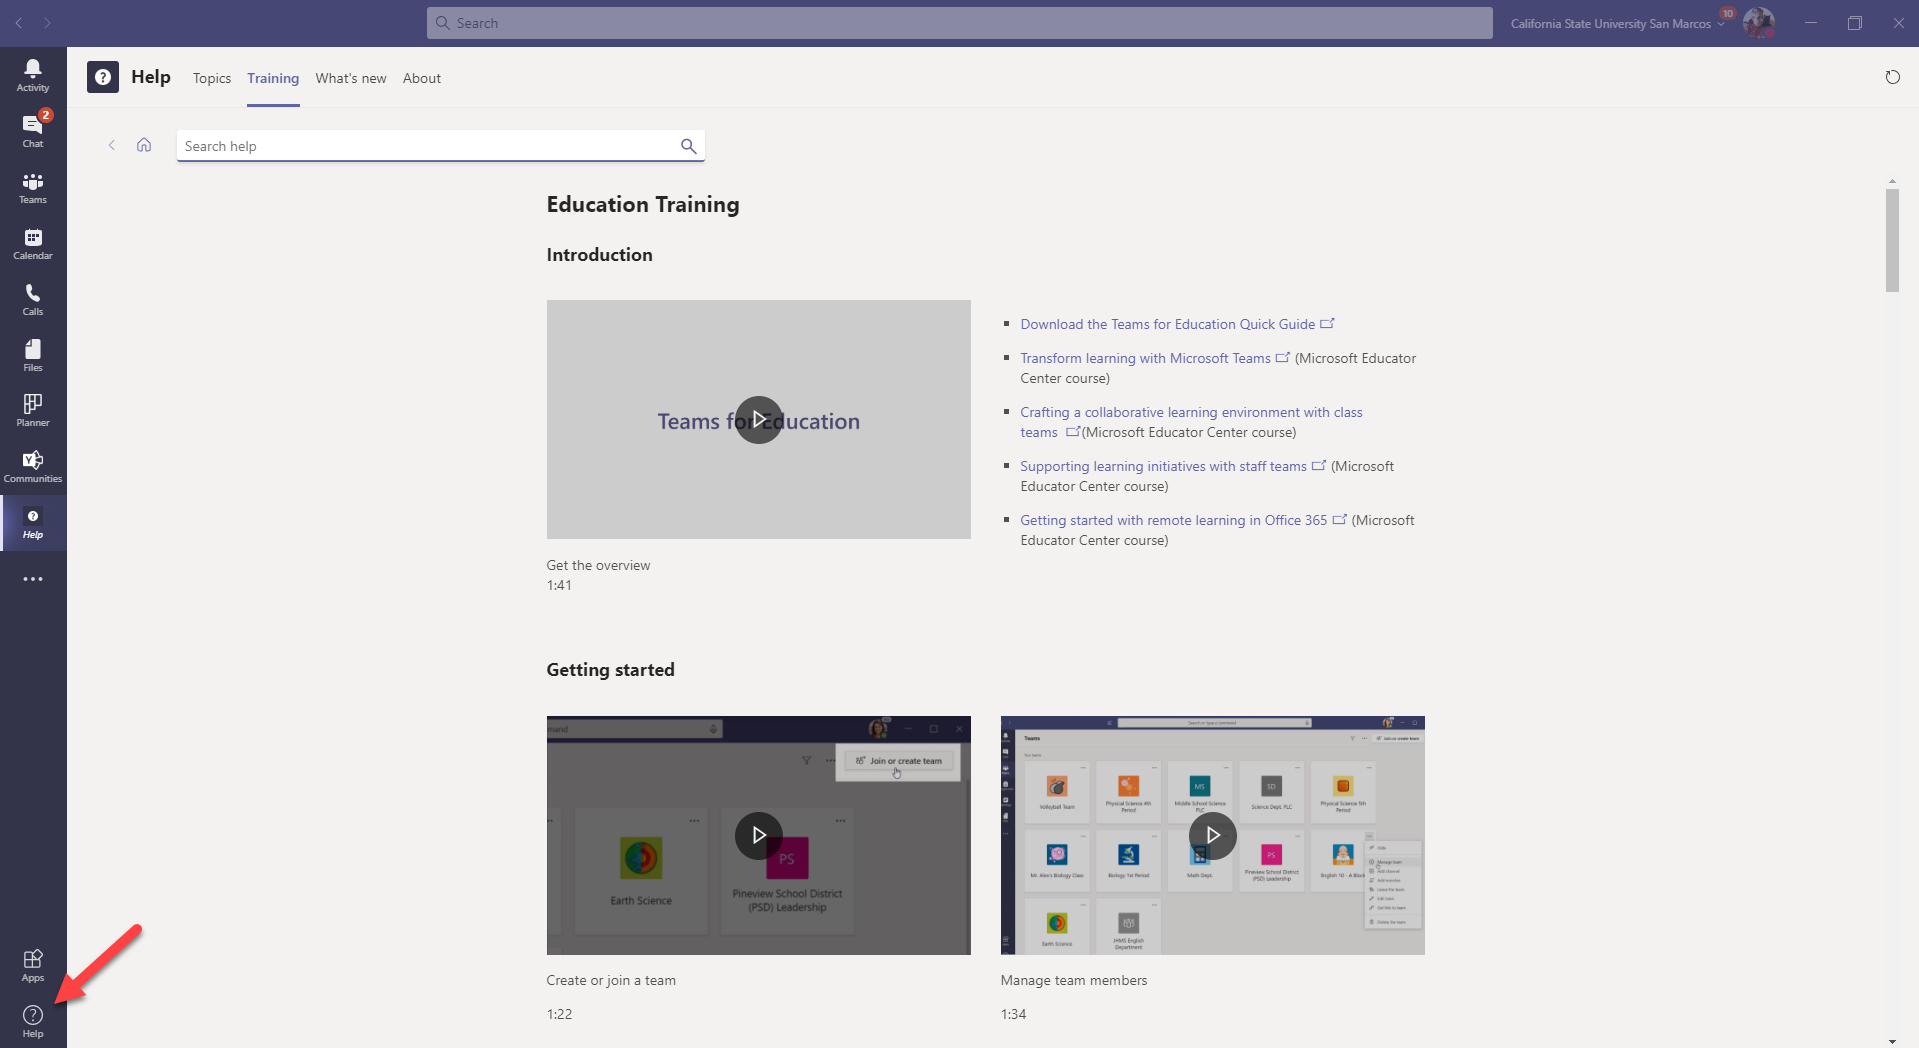
To access the Teams help, click on the Help tab and click on Training. From there you can either search for topics or simply browse through the videos.
Communicating Using Teams—Basics
- Chat versus a Team
In Teams you can communicate either through a Chat or in a Team.
Chat is primarily for 1v1 or small group communications where everyone needs to be aware of all that is said. Everyone in the chat will get notified for every message and included in every video and/or audio call (think of Chat as a group text message).
A Team is a virtual workspace better suited for established groups (e.g. a department, a committee, a student org) and for virtual classrooms. It can have a single channel (if Teams is a house, channels are the rooms) or multiple channels.
- How to message in a Chat
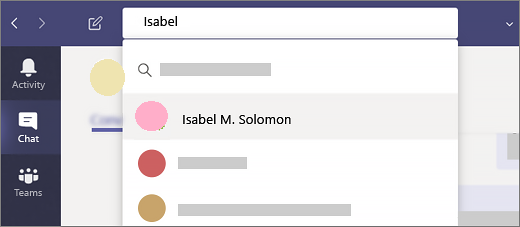
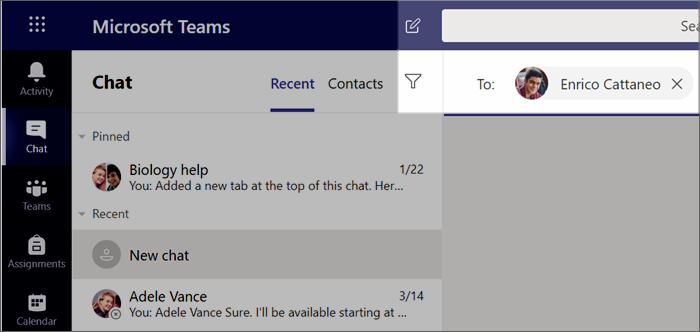
You can instantly message anyone on campus using the Chat tool.
Once you’ve selected New chat
 and entered the person’s name, compose your message in the box and select Send
  . This starts the chat.
Group Chat
Use a group chat when you need to talk to a small group of people. Start one the same way you start a one-on-one chat: select New chat
 at the top of your chat list. Select the down arrow to the far right of the To field and type a name for the chat in the Group name field. Next, type the names of the people you’d like to add in the To field.
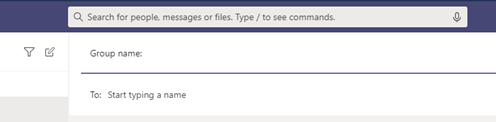
Formatting Your Message
There are lots of formatting options for messages.
To open your formatting options, select Format
 beneath the box where you type your message. In this expanded view, select the text
you want to format, then choose an option like B, I, or U to bold, italicize, or underline
the text.
beneath the box where you type your message. In this expanded view, select the text
you want to format, then choose an option like B, I, or U to bold, italicize, or underline
the text.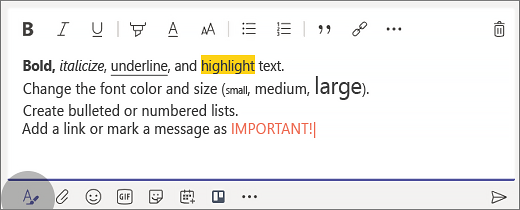
There are also options for highlighting, font size, lists, and more. Check out More options
 for additional formatting options, and the buttons below the box for attaching a file
or inserting fun stuff like emoji.
for additional formatting options, and the buttons below the box for attaching a file
or inserting fun stuff like emoji.Useful Tip: if you want to add a second line of text in the same message, click Shift+Enter.
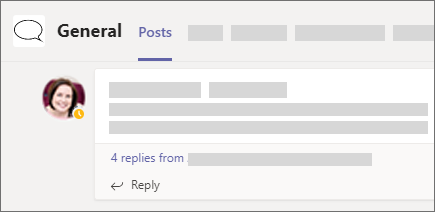
- How to message in a Team channel (NEW)
When you go to any channel in Teams the very first tab is Posts. Think of this as one big group chat. Everyone who has access to the channel can see the messages on the Posts tab.
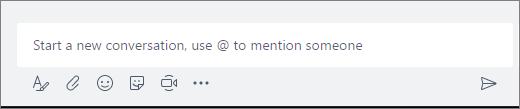
Starting a New Conversation
You can start a NEW Teams channel conversation by using the chat box at the bottom of the screen (similar to a chat).
Note: Teams is currently rolling out a new way to start Teams channel conversations. Instead of a chat box, you will see a New Conversation button instead. Clicking this button will reveal the chat box.

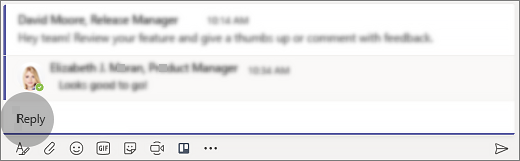
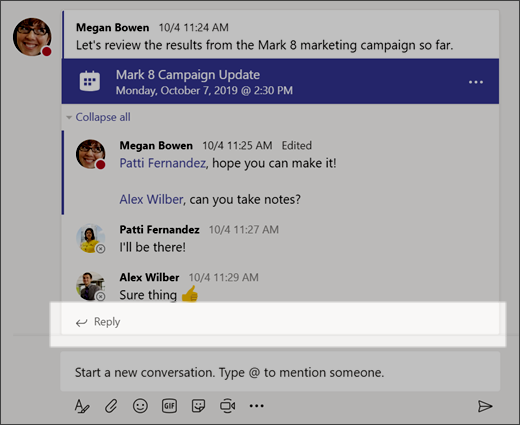
Replying to a post
The other important thing to know about messages in a channel is that replies to a channel message stay attached to the original message. This way, the whole thread of the conversation can be easily followed by anyone reading it. This is the beauty of threaded conversations!
To reply to a channel message, be sure to use the little Reply link underneath the message.
Drawing attention to a message
To draw attention to a message you are sending, you can use @ and a person's name (the name will pop-up once you start typing and you can select it), @channel (notifies everyone in the channel, and @Team (notifies eveyone in the Team). Using @ is a great way of ensuring those who need to read a message get notified.
Notifications (know when people are messaging)
Managing Notifications
- Manage Notifications
Microsoft Teams offers different ways to access, receive, and manage notifications. These settings include how, when, and where your notifications appear, custom settings for channels and chat, appearance and sounds, turning off specific messages, and so on.
To manage your notifications, select Settings and more
 in the top right of Teams, then select
  Settings >
  Notifications.
Customize channel notifications
-
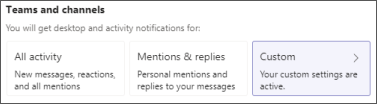
To be notified about all your shown channels, select All activity
-
To be notified only when you are @mentioned or when you receive replies to your messages in channels, select Mentions & replies
-
For the most control over your channel notifications, select Custom
Customize all other notifications
Choose the Edit button next to the category to customize how you receive notifications for that category.
Categories include Chat, Meetings, People, and Other.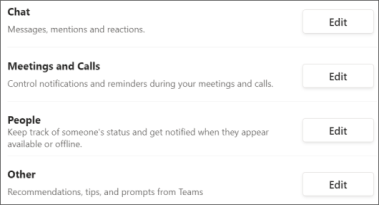
Only get notifications in the app
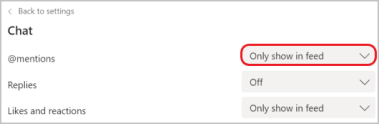
Select Edit next to Chat, then choose Only show in feed for a specific category. All notifications for that type of activity will be sent to Activity
, which you can find at the top left corner of Teams.Note: The app will still flash on desktop taskbar when notifications arrive, but no pop-up will show on your desktop.
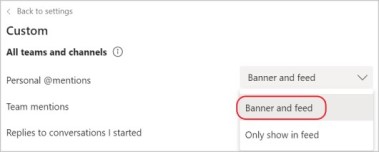
Get notified in the app and on desktop
Select Banner and feed to receive notifications as both a desktop notification and as an alert in Activity
.Choose whether or not a message preview shows on desktop by turning the toggle on for Show message preview.
Note: In Windows, notification banners will show in the bottom right of your screen. In macOS, they show in the top right.
Turn off notifications for specific conversations
In a channel conversation, go to the top right corner of the original message and select More options
 > Turn off notifications.
 As with muting a chat, turning off notifications to a channel conversation will stop updates for that specific conversation.
Note: You'll still receive notifications if someone directly @mentions you.

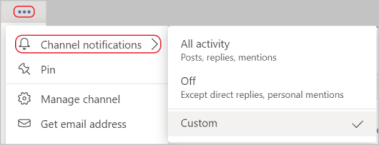
Change channel notifications from the teams list
Hover on a channel in your teams list and select More options
 > Channel notifications .
Choose from All activity, Off, or Custom—just as you would in settings. When you select Custom, a new window will open that has more options.
Note: By default, channel @mentions are turned off and all new posts will only show in Activity
.
-
Teams Video & Audio Meetings
Starting and Joining a Video Call
- New Video Meeting Experience
The latest team update is currently rolling out to everyone and is bringing a new video experience.
This new experience ushers in some big changes:
- Video calls in Teams will now open in their own screen separate from the main Teams window, allowing you to more easily use Teams while being on a video calls.
2. Meeting and call controls are now pinned at the top right of the window instead of hovering in the middle of the screen.

3. Together Mode and 49-people Large Gallery mode will appear as options (click on Using Video in Team Channels for more on these new features)
If your meeting and call controls aren't pinned at the top of your meeting window, follow these instructions to turn on the new meeting experience.
- Select your profile pic at the top of the Teams app, then Settings > General. (General should be what’s showing when you open Settings, so you probably won’t have to select it.)
- Select Turn on new meeting experience.
- Restart Teams by doing the following:
a. Right-click or Cmd-click the Teams icon in the Windows task bar or Mac System Tray.
b. Select Quit.
c. Start Teams again like you normally would. - Start a voice call or video call in a Chat
You can start a voice call or video call from a Chat window. This is an excellent replacement for calling someone's cell phone because as long as they have the Teams app on their phone, you can call them without needing to know their cell number.
You can make one-on-one or group calls with anyone directly from a chat without having to host a team meeting.
Go to your chat list, and click New chat
 to start a new conversation.
Type the name or names into the To field at the top of your new chat.
Then click Video call
 or Audio call
  to start a call.
Note: If a group chat includes more than 20 people, calling buttons will be disabled.

- Using Video in a Team Channel
Before a meeting
To turn on your video before a meeting, just select Turn camera on
right before you join. 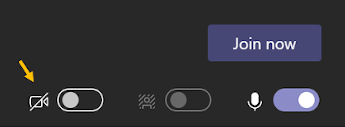
During a meeting
You might want to turn your video on and off over the course of a meeting—if you'd prefer people only see you while you're talking, for example. Go to the meeting controls anytime during the meeting and tap Turn camera on
. 
Change your video background
If you want to change what appears behind you in your video, you can either blur your background, or replace it entirely with any image you want.
When you're setting up your audio and video before a meeting, choose Background effects
 (right next to the mic switch). You'll see your background options on the right.
 For more details about customizing your background, see Change your background for a Teams meeting.
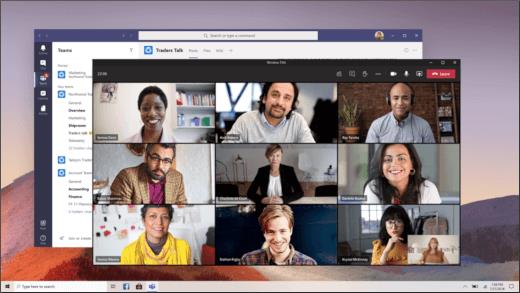
When you join a Teams meeting, you'll see the video streams of up to nine other people on your screen at the same time. This is the default Gallery view.

Notes:
-
If you're using Teams on the web, you'll only be able to see one video stream at a time (the video of whoever's speaking). For the best Teams experience, use the desktop or mobile app.
New Video Experience Layouts
You have several different video layouts to choose from, depending on the size of the meeting and the number of people you'd like to see on your screen at once.
Select More options
in the meeting controls, and pick the one you want: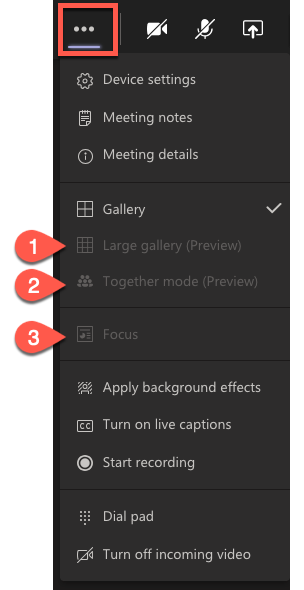
Gallery
The default view when you join a meeting. If there are more than nine others in attendance, Teams will prioritize the people who have their video turned on, as well as those that are speaking the most.
People that haven't turned on their video show as profile pics instead (or their initials if they haven't added one).
1. Large gallery
Enables you to see the videos of up to 49 other people at once. This option is available when at least ten people have their cameras turned on.

Note: If no one is sharing video, Large gallery won't be selectable in the menu.
2. Together mode
Lets you feel like you're in the same shared space with everyone in the meeting. For now, there's one auditorium-style space, but more options are on the way. This mode. currently used by the NBA, is only available when more than 5 people are in the meeting.

Together mode is available when at least five people are in the meeting. More seats will be automatically added to the virtual auditorium as more people join.
3. Focus
Available when content is being shared. This is the view to choose when you'd like to pay close attention to the content without the distraction of seeing people's video windows.
Additional Video Options
Pin someone's video
To pin someone's video to your view regardless of who's talking, select More options
in their video feed (next to their name) and choose Pin. Reframe a video
Teams crops some videos to make them fit your screen better. If you want a different view of a particular video—for example, if someone’s cropped out of the video or it only shows part of their face—select More options
in their video feed, and then Fit to frame to see the entire video.Select Fill frame to see a closer, cropped view.
-
- Raising your Hand
You can now Raise your Hand in meetings to ask a question or comment. In the Participants panel, you can see who has raised their hand in the order they have raised it.
During a meeting, you can raise a virtual hand to let people know you want to contribute without interrupting the conversation.
Just select Raise your hand
 in the meeting controls.
Everyone in the meeting will see that you've got your hand up.
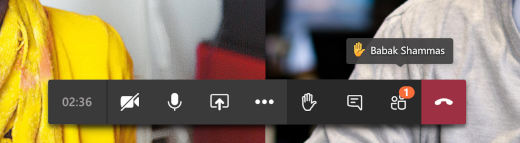
Meeting presenters will also receive a notification that your hand is raised, and they can lower your hand once you've had a chance to talk.
Select Show participants
 to see a list of everyone in attendance. Anyone who's raised their hand will have
an icon next to their name. When multiple people raise their hands, they'll be listed
in the order in which they raised them.
to see a list of everyone in attendance. Anyone who's raised their hand will have
an icon next to their name. When multiple people raise their hands, they'll be listed
in the order in which they raised them. - Sharing your Screen
To share your screen in a meeting, select Share content
 in your meeting controls. Then, choose to present your entire desktop, a window, a
PowerPoint file, or a whiteboard.
in your meeting controls. Then, choose to present your entire desktop, a window, a
PowerPoint file, or a whiteboard.Note: If you're using Teams on the web, you'll only be able to share your screen if you're using Google Chrome or the latest version of Microsoft Edge.
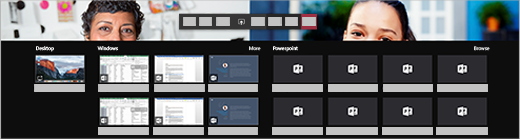
Sharing Options Share your... If you want to... Great when... Desktop
Show your entire screen, including notifications and other desktop activity
You need to seamlessly share multiple windows
Window
Show just one window, and no notifications or other desktop activity
You only need to show one thing and want to keep the rest of your screen to yourself
PowerPoint
Present a PowerPoint file others can interact with
You need to share a presentation and want others to be able to move through it at their own pace
Whiteboard
Collaborate with others in real time
You want to sketch with others and have your notes attached to the meeting
When you're done sharing, go to your meeting controls and select Stop sharing.
- Joining a Video Call
Teams meetings are best when you join them from the Teams app or Teams on the web, and there's a bunch of ways to do that—read on for details about joining by link, from your calendar, and more.
Join by link
All you need to join a Teams meeting is a link found in your email invitation.

Select Join Microsoft Teams Meeting in your meeting invite to be taken to a page where you can choose to either join on the web or download the desktop app. If you already have the Teams app, the meeting will open there automatically.
If you don’t have a Teams account and the organizer has allowed it, you may have the option to enter your name to join the meeting as a guest. If you do have a Teams account, select Sign in to join with access to the meeting chat and more. Then, depending on the organizer’s settings, you may join the meeting right away or go to the lobby where people in the meeting can admit you.
Join from calendar (faculty & staff only)
Select Calendar
 on the left side of the app to see your meetings. Find the meeting you want, and then
select Join.
on the left side of the app to see your meetings. Find the meeting you want, and then
select Join.
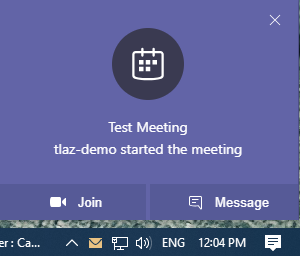
Join a meeting that has just started
If someone starts the meeting, you'll get a notification with a Join button you can use to join the meeting.
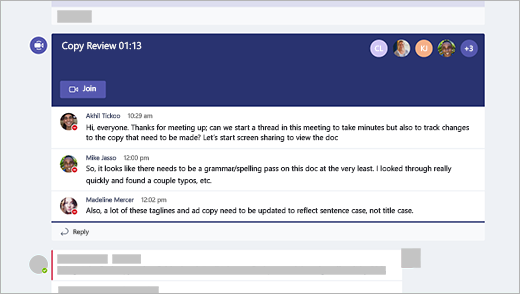
Join in a channel
If a meeting takes place in a channel, you’ll see an invitation to join, relevant content, and who’s in the meeting right in the channel. Just select Join.
- Recording Teams Meetings
Start recording
When you start recording a meeting, you also turn on live transcriptions (if your IT admin allows transcriptions).
-
Start or join the meeting.
-
Go to the meeting controls and select More actions
> Start recording.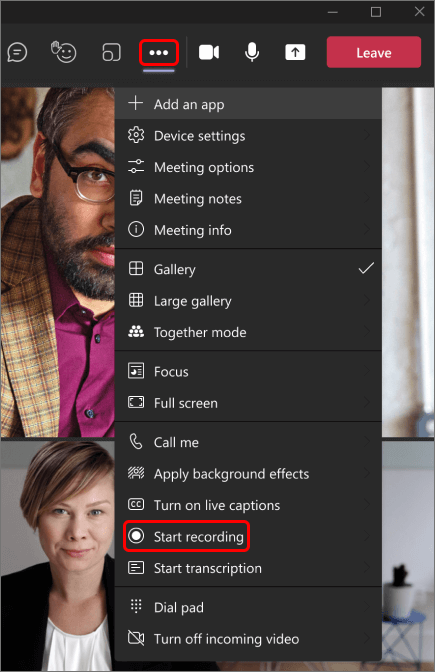
Everyone in the meeting gets notified that recording and transcription have started.

Notes:
-
You can't make multiple recordings of the same meeting at the same time. If one person starts recording a meeting, that recording will be stored on the cloud and available to all participants.
-
Meeting participants have the option of viewing the transcription during the meeting. For details, see view live transcription.
-
Stop recording
-
Go to the meeting controls and select More actions
. -
Choose one of the following:
-
Stop recording: Stops the recording and live transcription.
-
Stop transcription: Stops just the live transcription. The recording continues until you select Stop recording.
-
Find recordings
Recordings are available in different places depending on the type of meeting.
-
The recording is processed and saved to SharePoint if it was a channel meeting or OneDrive if it was any other type of meeting.
-
The meeting recording shows up in the meeting chat or channel conversation (if you’re meeting in a channel). The recording doesn't expire.
Note: For now, guests and external attendees can view the recording only if it's explicitly shared with them.
Who can start or stop a recording?
Anyone who meets the following criteria can start or stop a recording, even if the meeting organizer isn't present.
-
Has one of the following licenses: Office 365 Enterprise E1, E3, E5, F3, A1, A3, A5, M365 Business, Business Premium, or Business Essentials.
-
Has recording enabled by an IT admin.
-
Isn't a guest or from another organization.
User Recording Premissions Type of user
Can start recording?
Can stop recording?
Meeting organizer
-
Yes
-
Yes
Person from same org
-
Yes
-
Yes
Person from another org or company
-
No
-
No
Guest
-
No
-
No
Anonymous
-
No
-
No
Notes:
-
Recording continues even if the person who started the recording has left the meeting.
-
The recording stops automatically once everyone leaves the meeting.
-
If someone forgets to leave the meeting, the recording automatically ends after four hours.
-
If one of the participants has a policy for compliance recording, the meeting will be recorded according to the policy even if that participant is from another org or company.
-
- Teams Recordings Stored in OneDrive and Sharepoint (NEW!)
Starting August 15th, Microsoft is changing the location of Microsoft Teams meeting recordings.
From that day on, your Teams meeting recordings will be saved on Sharepoint and Onedrive rather than on Stream (like they used to). The recordings still play through a new version of Stream.
What changes for you:
- Your Chat/Meeting recordings will be stored in OneDrive (just like any file you share on Chat)
- Your Teams Channel Meetings recordings will be stored in that team's SharePoint (or Files tab)
- You can now more easily share these recordings, which works just like sharing any other document
Breakout Rooms
- Overview Video
- Setting Up Breakout Rooms
Create breakout rooms
-
Start the meeting.
-
In the meeting controls, select Breakout rooms
 .
.
-
Select the number of rooms you want (50 is the max), and whether you want Teams to assign all the people to rooms (Automatically) or whether you want to choose who will join each room yourself (Manually).

Note: This menu is the only time you can have people automatically assigned to breakout rooms. You won't be able to change this option once you create the breakout rooms.
-
Select Create Rooms.
Assign people to breakout rooms manually
If you have chosen Automatically, participants will be randomly assigned to breakout rooms as soon as you open the rooms.
If you have chosen to assign them Manually, then follow these steps.
-
Select Assign participants.
-
Choose the people who will share a breakout room by first selecting the check boxes next to their names.
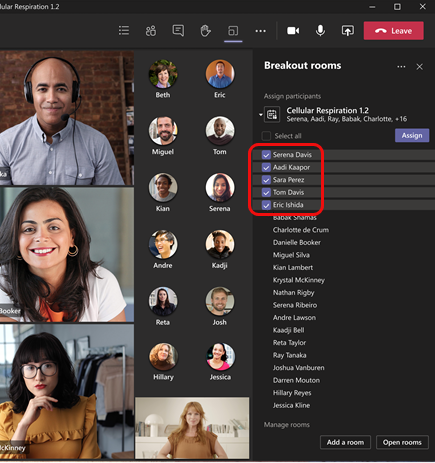
-
Select Assign and then select a room for those people with the checkmark next to their name.
-
Repeat steps 2 and 3 until everyone has been assigned to a room.
Rename the breakout rooms
You can rename each room so the name reflects the names of the users, its purpose, etc.
-
Hover your cursor next to the room, select More options
 , and then select Rename room.
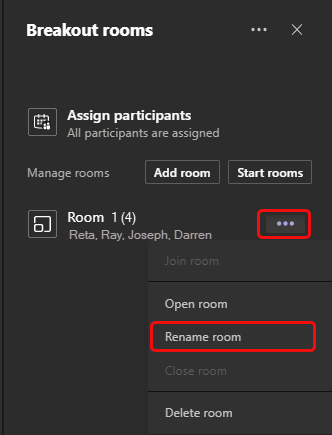
-
Enter the new name and select Rename room.
Tip: If during the meeting you decide you want your breakout rooms to look and operate differently, you can Recreate breakout rooms from scratch for details.
Add an additional breakout room
-
Select Add room in the Breakout rooms pane.
Delete a breakout room
-
Point to the room, select More options
, and then Delete room.
Recreate breakout rooms from scratch
During a meeting, you can return to the beginning of the breakout rooms process to reconfigure the rooms and assignments.
-
Select More options
at the top of the Breakout rooms pane and then select Recreate rooms. -
Follow the instructions above to create new breakout rooms and assign people to them.
-
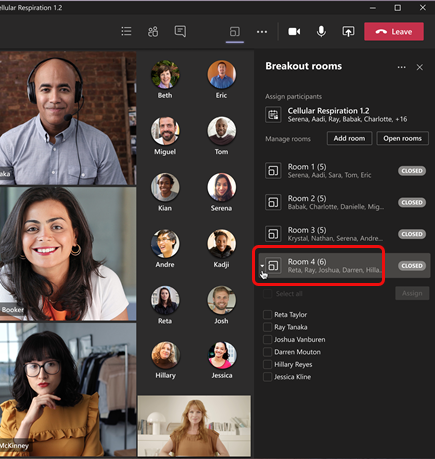
- Opening and Closing the Breakout Rooms
Start using the breakout rooms
By default, meeting participants are moved to their assigned rooms as soon as you open the room, but you can turn off this setting; see Turn off automatic entry to breakout rooms.
-
To open all the rooms at the same time, select Start rooms.
-
To open a single room, select More options
next to the room and then Open room.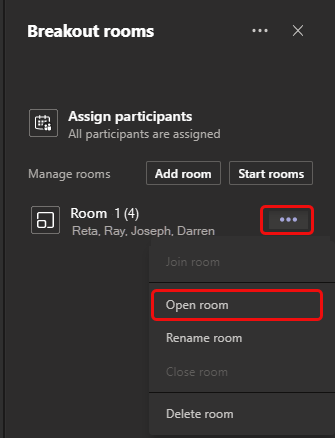
You can open and close breakout rooms more than once during a meeting.
Turn off automatic entry to breakout rooms
By default, participants are automatically moved into breakout rooms when they're opened. When you turn off this option, participants receive a message asking them to join a breakout room. They select Join room (Join on a mobile device) before being moved.
-
Select More options
at the top of the Breakout rooms pane and then select Rooms settings.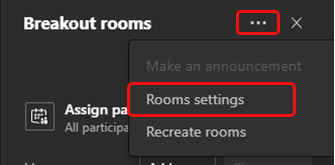
-
Switch the toggle next to Automatically move people into opened rooms to off.
Close breakout rooms
When you close the breakout rooms, the participants return to the main meeting.
To close rooms individually
-
Select More options
next to the room, and then Close room.
To close all the rooms at the same time
-
Select Close rooms.
You'll know rooms have successfully closed when their status changes to Closed.
When everyone is back from their breakout rooms and you're ready to meet as a larger group again, select Resume.
Note: Breakout rooms remain open until the organizer manually closes them, so they can be reused later in the meeting.
-
- Managing and Interacting with Participants (join rooms, message participants)
Interact with breakout room participants
As meeting organizer, you can join any of the breakout rooms, contribute to any of the room chats, and send announcements to everyone.
Join a breakout room
-
Select More options
next to the room and then Join room.
To leave a room, select Return.
Send an announcement to all breakout rooms
You may want to send announcements to give time updates, for example, or share discussion prompts.-
Select More options
at the top of the Breakout rooms pane and then select Make an announcement.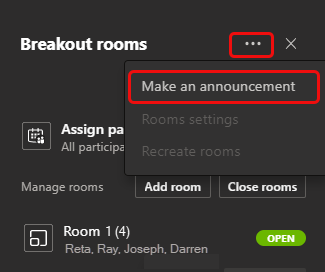
-
Enter your announcement and select Send.
Participants will receive a notification in their meeting chat to check for your announcement.
Chat in breakout rooms
Each breakout room has its own chat, and all of the chats are available in your main Teams Chat list.
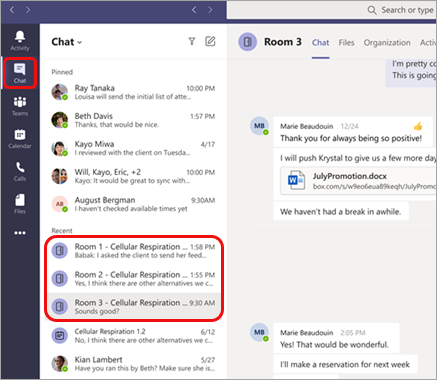
Here you can chat with the members of any breakout room.
Once you’ve joined a breakout room, you can also select Chat
 in the room to chat with the people there.
Note: When the breakout room closes, the room chat ends and cannot be continued. However, you'll still be able to view the chat history and any shared files.
Allow participants to return to main meeting
By default, this setting is off. Turning it on gives participants the option to leave their breakout rooms and return to the original meeting to rejoin the larger discussion.
-
Select More options
at the top of the Breakout rooms pane and then select Rooms settings. -
Switch the toggle next to Participants can return to the main meeting to on.
Move someone to a different breakout room
Note: Currently, participants can be moved only when breakout rooms are closed.
-
Expand the list of participants under a breakout room.
-
Point to someone‘s name and select the check box that appears.
-
Select More options
and then the breakout room you want to move that person to.
-
Scheduling a Video Call on Teams and Outlook
- Scheduling a video meeting in Teams (faculty & staff only)
There are several ways to schedule a meeting in Teams:
-
Select Schedule a meeting
 in a chat (below the box where you type a new message) to book a meeting with the
people in the chat.
in a chat (below the box where you type a new message) to book a meeting with the
people in the chat. -
Go to Calendar
on the left side of the app and select New meeting in the top right corner. -
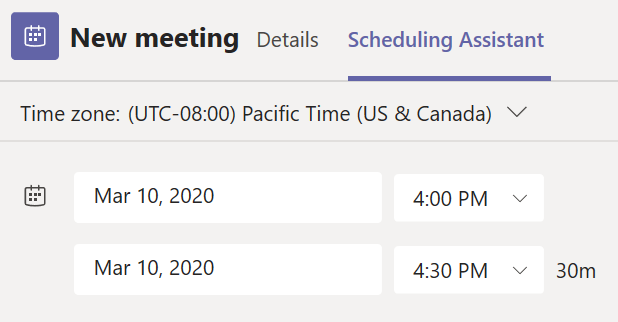
Select a range of time in the calendar. A scheduling form will pop open.
The scheduling form is where you'll give your meeting a title, invite people, and add meeting details. Use the Scheduling Assistant to find a time that works for everyone.
Once you're done filling out the details, select Save. This will close the scheduling form and send an invite to everyone's Outlook inbox.
Make it a channel meeting
-
Select New meeting.
-
Type the name of a channel where it says Add channel (under the time and date fields).
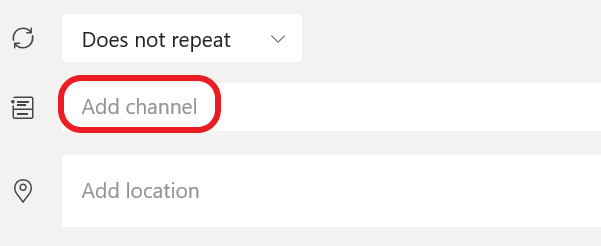
Channels can't be edited or added once the invite is sent. You'll need to send a new invite with the updated channel.
Notes:
-
When you have a meeting in a channel, everyone in the team will be able to see it and join it in that channel.
-
This feature isn't available in private channels.
Make it a recurring meeting
You can schedule recurring meetings on Teams.
- Click on Does not repeat
- Select appropriate frequency
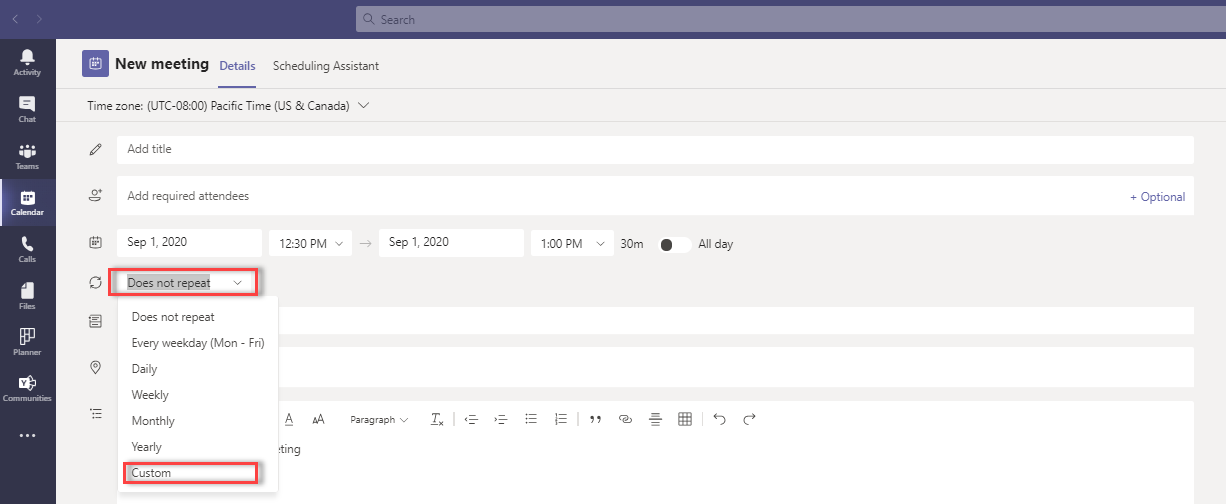
You can set custom frequency by using the Custom button.
- To schedule a meeting to take place several times a week every week, select Week
- You will see a list of the days of the week
- Select the appropriate days.
- Click Save
-
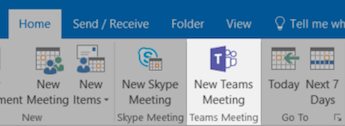
- Scheduling a video meeting in Teams using Outlook (faculty & staff only)
Microsoft Teams includes the Outlook add-in, which lets you create new Teams meetings directly from Outlook. It also lets people view, accept, or join meetings in either app.
Note: Currently, you can schedule Teams meetings from Outlook, but not choose a channel to have them in.
To schedule a meeting in the Outlook desktop app:
- Open Outlook and switch to the calendar view
- Click New Teams Meeting at the top of the view.
In the Meeting Window:
-
Add your invitees to the Required or Optional field(s)—you can even invite entire contact groups (formerly known as distribution lists).
-
Add your meeting subject, location, start time, and end time.
-
Create your message.
-
Then click Send.
The email invitation sent will include a link for attendees to directly join the meeting.
Managing meeting participants
- Managing Participant Roles During a Meeting (Presenter vs Attendee)
Attendees vs Presenters (Meeting Roles)
In Teams video meetings you can assign who will be a presenter and who an attendee.
- Presenters can take all kinds of actions during and before a meeting: present, mute or remove participants, change participants roles (from presenter to attendee or back), and more.
- Attendees can only speak and share video as well as use the chat.
Changing Meeting Roles
To choose who will be an attendee and who a presenter during a meeting:
- Click the Participants tab

2. Click on the Ellipsis and click on Manage permissions
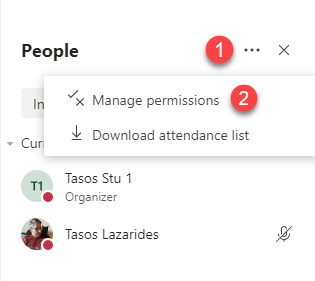
3. The permissions menu will open on a separate screen
On this screen, you can:
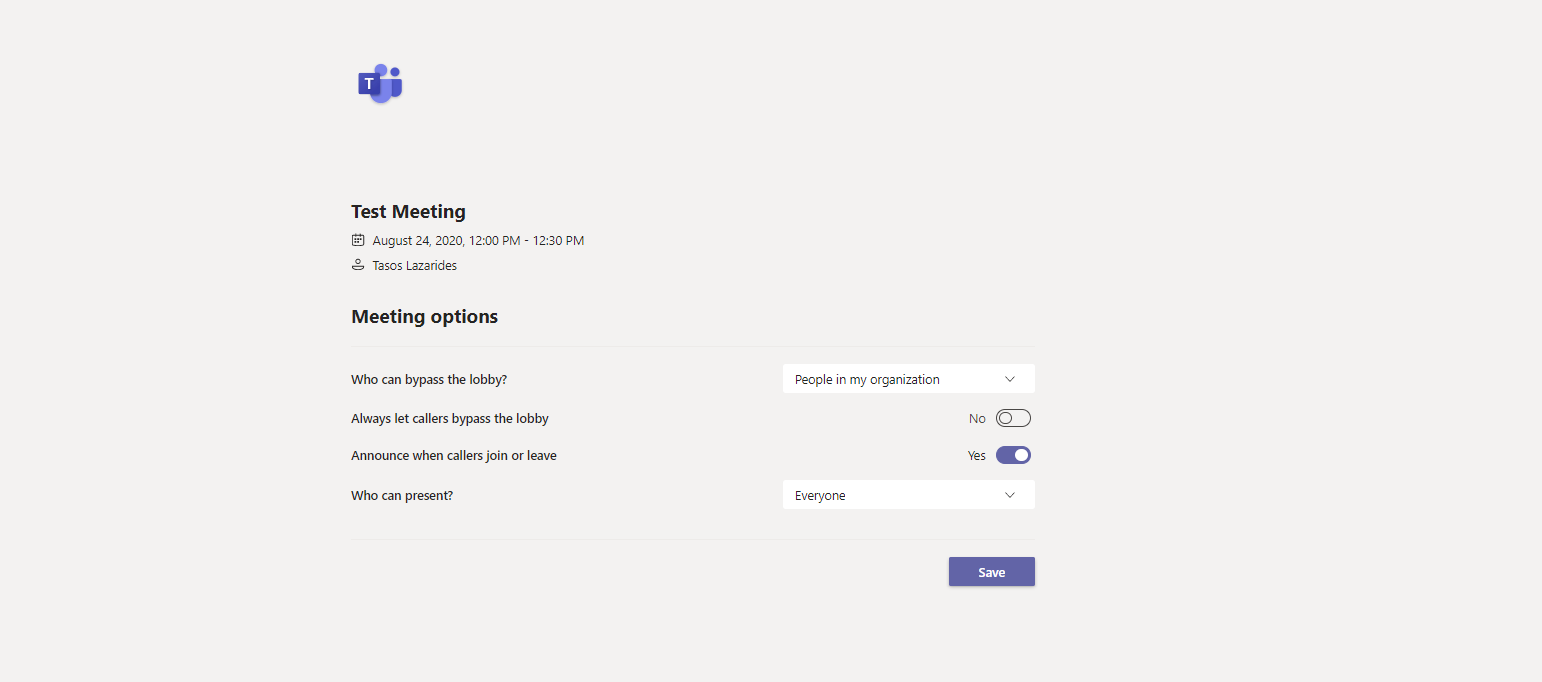
Set Lobby SettingsCurrently for all Teams meetings any non-CSUSM users are automatically placed in the lobby and cannot access the meeting unless the organizers allow them.Set PresentersYou can select everyone, specific people, or only you as the presenter.
Note: Anyone who is not set as a presenter becomes an Attendee
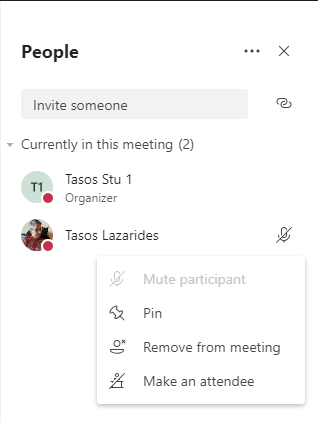
- Managing Participants During a Meeting
During a meeting, you can take a variety of actions like muting participants, removing them from a meeting, or changing their roles.
- Click the Participants tab
- Click on the ... next to a participants name
- Select the appropriate action
- Click the Participants tab
- Managing Meeting Lobby
If any participant is placed in the lobby, you will see a red notification on the participants tab.
Important: Members of our community will always bypass the lobby UNLESS they are not using the Teams desktop app and haven't signed into Teams on their browser.
To manage the lobby:
- Click the Participants tab
- Click the checkmark or cross next to the user placed in the lobby
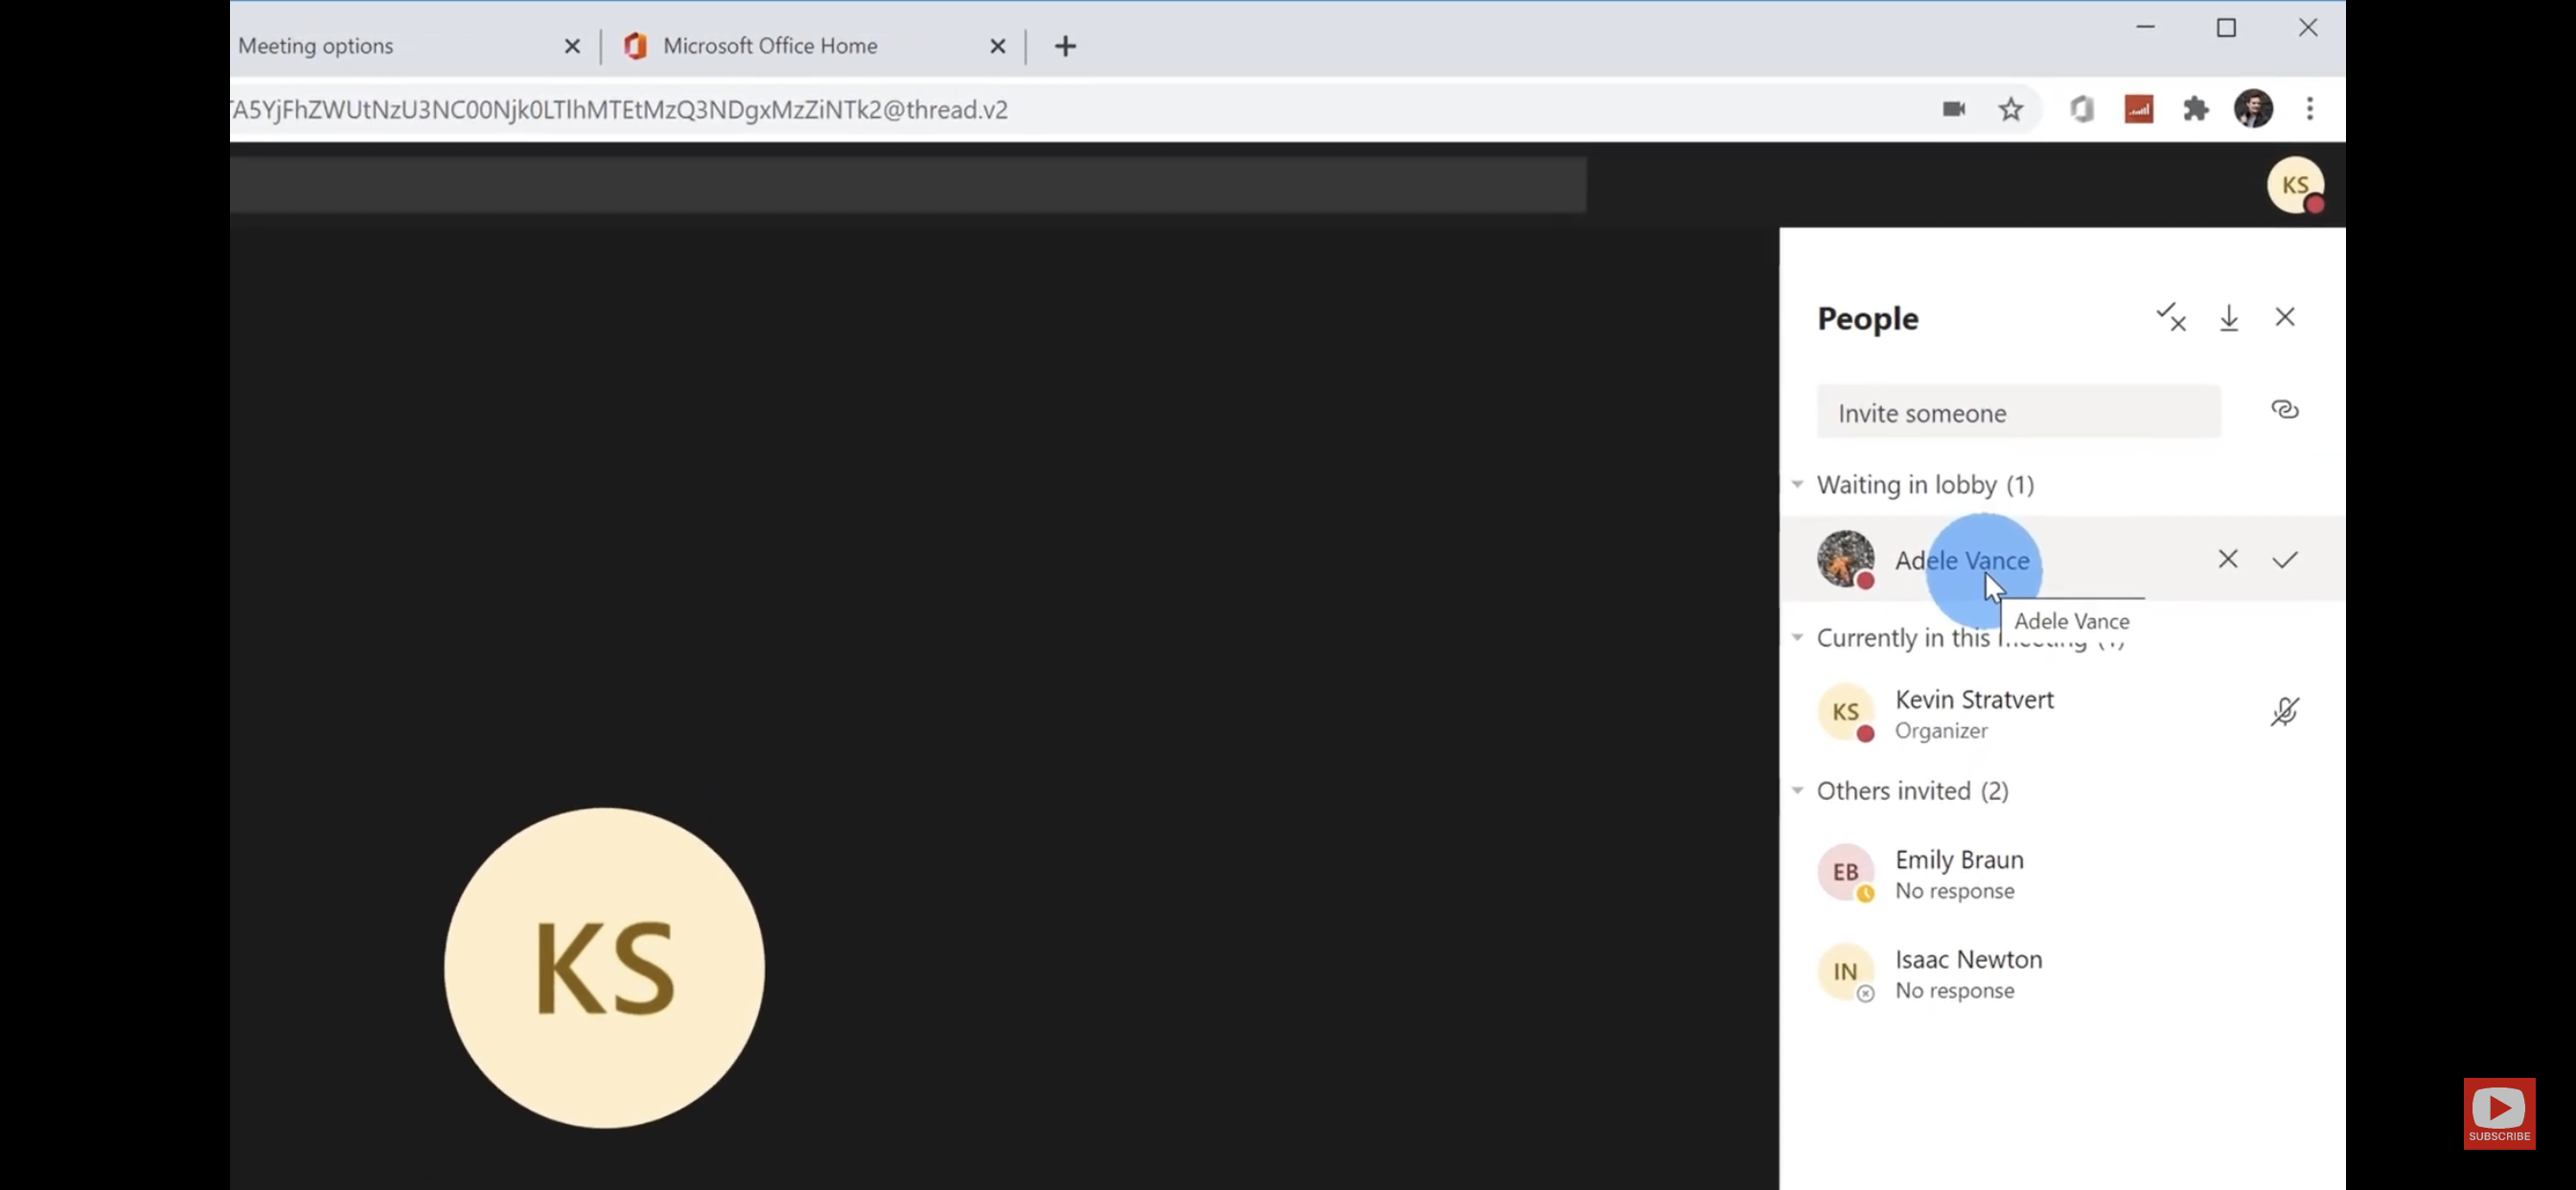
- Click the Participants tab
- Inviting people outside our organization
Teams lets you invite people outside your organization, including those who don't have a Teams license. You'll need their full email address to invite them.
-
In the meeting invitation, go to Add required attendees. If anyone is an optional attendee, select Optional instead.
-
Type the person's full email address (ex: Joe@example.com).
-
Select Invite. They'll receive an email with a link to the meeting, and they do not need a Teams account to join.
-
Searching for Chats and Documents
- Using Teams Search Bar
You’ve got a few search and filtering options to help you find messages, people, files, and other information shared in Teams.
NOTE: Currently Teams search locates only files in team channels, not in 1:1 chats

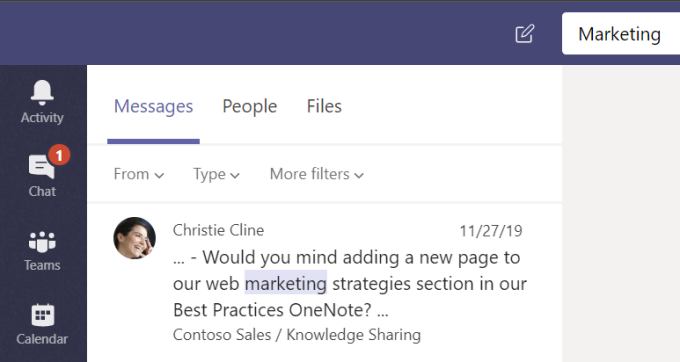
- Start any search from the search box at the top of the app.
- When you type a word or name, Teams will start to make suggestions.
- Either click on one of the suggested items, or press Enter to get a full list of results.
- You'll see a list of search results on the left side of the app.
- Select one of the items to get a full view of the item.
Search for one-on-one or group chats
- Type the person’s name in the command box at the top of the app.
- You’ll see their name and any group chats listed.
- Select their name to go to your one-on-one chat with them, or select a group chat to pick up where you left off.
Search for group chats by the chat name (if it has one) or search by the name of the chat participants.
Search for messages
- Start typing a keyword into the command box at the top of the app and press Enter.
- You’ll see a list of results that include the keyword.
Search your current window with Ctrl+F
Use Ctrl+F (cmd+F on macOS) to search messages within a particular chat or channel in Teams.
-
Select the area you want to search—say, the chat you were having or the General channel within a team.
-
Type Ctrl+F followed by your search terms, then press Enter. All the search results from within that chat or channel will be displayed.
-
Select any one of the available results and Teams will scroll to the location of that particular message.
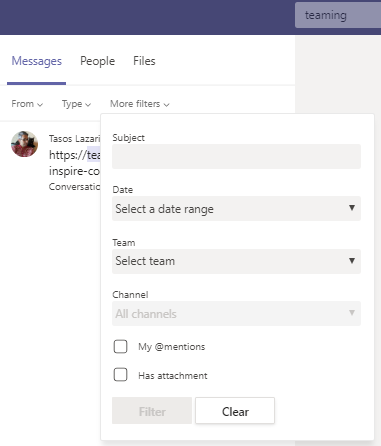
- Using Teams Filters
Teams filters allow you to easily narrow your search and locate your files/chats/people faster.
- After you’ve entered your search terms into the search box, first use the Messages, People, and Files tabs above your results to refine your search.
- A second tier of filters appears after you make your initial selection, allowing you to get more granular results.
For example, if you select Messages, you can then filter by who the message is from, whether it was a chat or a team message, date range, and more.
Creating & Managing a Team
- Creating a Team (faculty & staff only)
Faculty and Staff can create one or multiple Teams, which provides groups with a collaboration space (chat, voice/video calls, file sharing, etc.). When you create a Team, it automatically creates a SharePoint site with the same name as the Team.
There are four types of Teams one can create. If you want to create a virtual classroom, then select the Class team type. If you want a Team where every member has equal permissions (e.g. creating new channels), then select Professional Learning Community (PLC) team type. And if you want a Team with a hierarchy (controlling Team setting etc.), then select Staff team type.
The Other Team is the easiest and most customizable of the rest, so it is recommended you use that type of Team for most purposes.
To get your team up and running in Microsoft Teams, create a team, add people, and add channels.
Create a team
-
Select Teams > Join or create a team.
This is where you create your own team, or discover existing ones.
-
Select Create a new team, and then select Build a team from scratch or select Create from... to build an all-new team or create from an existing group respectively.
-
Select Private if you'd like people to request permission to join, or select Public if anyone in your org can join.
-
Give the team a name and add a short description if you'd like.
-
Select Create.
-
Add members.
You can add people, groups, or even entire contact groups.
If you need to add people from outside your organization, use their email address to invite them as guests. Add a friendly display name for them too.
-
When you're done adding members, select Add and then Close.
-
- Creating Team Channels
By default, every team gets a General channel, which is a good channel to use for announcements and information the whole team needs. To add more channels:
-
Select
 More options... next to the team name.
 -
Select Add channel.
-
Enter a name and description for your channel.
You can build a channel around a topic, project, department name, or whatever you like.
-
Select Automatically show this channel in everyone's channel list if you want this channel to be automatically visible in everyone's channel list.
-
Select Add.
-
- Managing your Team
-
Select
More options... next to the team name. -
Select Manage team to find Members, Channels, Settings, and Apps for your team all in one place.
-
Select Settings > Team picture to add a team picture and give your team some personality.
-
Sharing Files and Co-Editing—QuickGuide
- Sharing Files
When you share files in a Chat, the file is uploaded to OneDrive, which makes collaboration easy.
When you share files in a Team, they instead go to SharePoint.
In both instances, you can edit Office files on Teams or in the online and desktop Office apps, with options to collaborate with others in real-time.
As your team works together you'll undoubtedly have files that you'll want to share and collaborate on. Teams makes it easy to share files and work on them together. If working in Word, Excel, PowerPoint, or Visio files your colleagues can even view, edit, and collaborate on them, right within Teams.
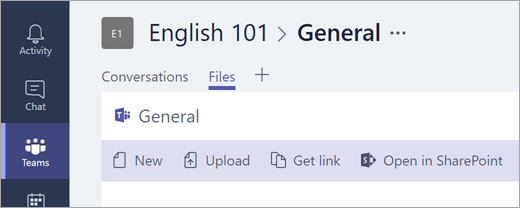
Your files library
Each channel has its own file folder where you can share files for that specific channel. To access that folder go to the channel and select the Files tab above the conversation window.
In the library you can upload existing files or create new ones.
Note: When you upload a file, it creates a copy in Teams.

Upload existing files
There are two primary ways to upload existing files into your library. Both methods start by going to the files folder for your channel and both methods, by default, upload copies of your files to the channel file folder.
-
Drag and drop - Using your mouse, drag the file from where it's currently located and drop it on the Teams window among the files.
-
Upload - Select Upload,then select the file (or files) you'd like to upload, and select Open.
Any files you upload will be accessible by any member of your team. And just like in SharePoint, you can pin specific files to the top of your list for easy access.
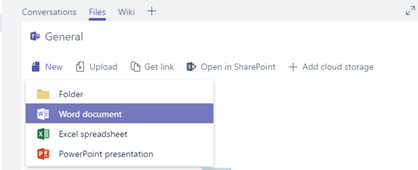
Create a file
To create a Word, PowerPoint, or Excel document in Teams:
- Select New
- Select the kind of file you'd like to create.
The new file will open in Teams so you can begin editing it in the app itself.
As soon as it's created your new file will be available for your team members to edit as well.
Note: If you'd prefer to work in the desktop version of the app, select Open in Desktop App at the top of the app, in the middle of the ribbon.

Co-edit a file
Files uploaded and shared to a team are accessible to every member of the Team. In Office for the web, Office for Android or iOS, or the latest applications from Microsoft 365, you and your team members can co-edit Word, PowerPoint, or Excel documents. No need to check files out or worry about if one of your colleagues has the document open. Just open the file you need to edit and if other team members are editing it too your changes will be seamlessly merged as you work.
-
Using Teams for Virtual Student Drop-Ins
- Virtual Student Drop-Ins
With Teams, you can create Virtual Student Drop-In spaces where students can seek support through chat, audio, or video calls. Advising and Tutoring Centers are already utilizing Teams in this manner.
If you wish to explore such a possibility for your area, please email teamssupport@csusm.edu.
Using Teams for Virtual Instruction—Quick Guide (In addition to the Guides above)
- Creating and managing a Classroom
It's very easy to create a Classroom for your course. IITS can also create the classroom for you. If you're interested in running your class on Teams, email teamssupport@csusm.edu for further support.
Teams allows you to manage every aspect of the classroom (adding student assistants, creating channels for group projects, and more), and the Settings tab gives you even more customization options.
- Adding Students
You can add students to your Classroom in multiple ways.
One way is to simply use the Add Member menu. If you want your class pre-loaded with your students, please contact teamssupport@csusm.edu.
You can also provide students with a link or a code to the Classroom team. The link will allow you to approve who joins the course, but the code will add them to the Classroom without you having to approve each one.
- Office Hours through Teams
The easiest way to have Office Hours through Teams is through the Chat tab. Either you or the student(s) can initiate a chat (text, video, or audio) and talk in private, since Chats (not Teams) are only visible to those who are participating.
Students can share documents with you in the chat, and you can even edit those documents together (see the Sharing Files guide on this page).
If you want to let your students know what times you are available to talk to them, you can set a status message, which will appear whenever someone tries to talk to you through Chat.
Syllabus Language:
Start a conversation with one student or a group of students
- At the top of the app, click New chat .
- In the To field, type the name of the student(s) you'd like to message.
- Type your message in the compose box and select Send .
- Click Video call or Audio call to start a call.

Start a conversation with your instructor
- At the top of the app, click New chat .
- In the To field, type the name of your instructor.
- Type your message in the compose box and select Send .
- Click Video call or Audio call to start a call.
Quick access to a chat
Pin a chat
- To pin a chat, select More options > Pin. The chat appears in the Pinned list at the top of your chat list.
- To unpin a chat, select More options > Unpin.
Note: You can pin up to 15 chats.
Communicating with students
- Messaging Students
Message your class
-
To create a message for your whole class, click Teams
 , then pick a class team and a channel.
 -
Select the Posts tab.
-
Click the compose box, type your message, and click Send
 .
. -
Use @ and the name of your class to notify everyone of your post. Example: @math123.
Start a conversation with one student or a group of students
-
At the top of the app, click New chat
. -
In the To field, type the name of the student(s) you'd like to message.
-
Type your message in the compose box and select Send
.
Reply to a conversation
Posts in channels are threaded like social media posts. Reply under the original post to keep all the messages in a conversation organized together.
-
Find the conversation thread you want to reply to.
-
Click Reply, add your message, and click Send
.
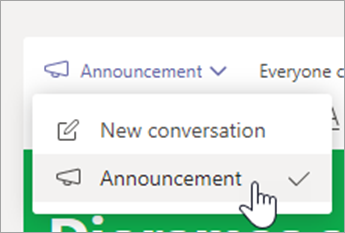
Announcements
Use the Announcements feature to draw your students' attention to important posts.
-
Select Format
 to expand the Compose box.
 -
Choose Announcement and Select a background color to customize an important post.

Add some fun with stickers and more
-
Click Sticker
 under the compose box to select from a range of custom Microsoft Education stickers.
 -
Select Emoji
 for smiley faces and Giphy
  for animated GIFs.

-
- Create quick polls for student feedback/interaction
The Classroom in Teams can easily be expanded through apps, and a useful app is Polly, which you can add to any Team. You can easily start a poll through Polly (including simply typing @polly question? answer 1, answer 2, answer 3, etc for a quick poll).
You can also create advanced polls, which can be anonymous.
Student Collaboration on Teams
- Creating Channels for Group Work or Study Groups
Create channels within your class team to organize students to work together on group projects. You can create as many as 100 channels per team.
All students in the class team can view the team’s channels—notify the students you’d like to work in each one. Use the Files, Conversations, and Notes tabs in each channel to organize group collaboration.
-
Navigate to a class team and then select the More options
icon next to the team name.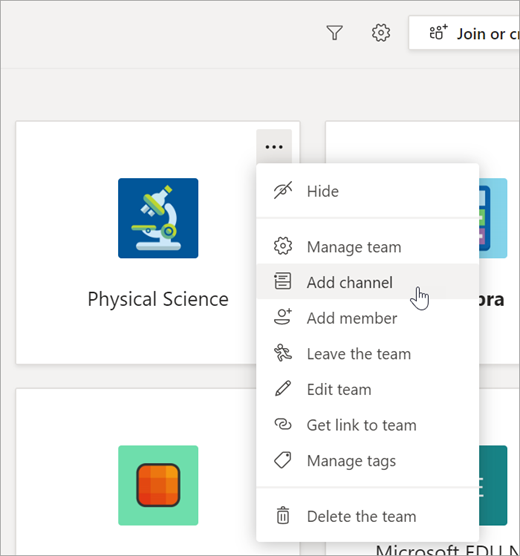
-
Select Add channel.
-
Name your new channel and add a description.
-
Select Add.
-
All team members automatically have access to all your team's channels. Use @mention in your new channel to invite students to participate.
Collaborate using the Files, Conversations, and Notes tabs
There are several ways for students to collaborate within a channel.
-
Use the Conversations tab to discuss topics with each other and attach resources.
-
Interact with files. Create new files in the Files tab or upload files you’d like group members to work on from your computer or from SharePoint. Files attached in Conversations will also show up here.
Only teachers have permission to add attachments in class teams.
-
The Notes tab can be edited by multiple students at once. Use its tools to type, draw, or insert pictures and links. Students can add more pages to Notes with the Add a tab
 icon. Each channel’s Notes tab corresponds to a section in the Class Notebook Collaboration
Space. Select Open In Desktop to launch OneNote and continue collaborating there.
icon. Each channel’s Notes tab corresponds to a section in the Class Notebook Collaboration
Space. Select Open In Desktop to launch OneNote and continue collaborating there.
Pin website resources
Select the Add a tab
icon in your tabs to add educational apps you use in class or to pin websites and
other resources. Students can surf websites you pin here without opening their browsers.
You can also pin important documents and PDFs for reference. -
Managing the Classroom
- Dealing with Disruptions
Mute students from commenting in class conversations. This means students will no longer be able to see an inappropriate comment and that the muted students can no longer post or reply in class conversations. You can un-mute students at any time.
Mute students in settings
-
Select More options
on your team's tile. -
Select Manage team.

-
Select the Members tab. You’ll see your students listed. Select the checkmark box under Mute students to prevent students from commenting or select the top checkbox to mute all students at once.
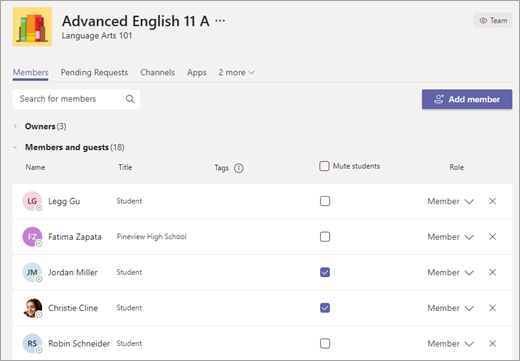
Note: Un-mute students by returning to settings and de-selecting the checkbox next to their names.
Mute a student from a message
-
Navigate to the student message you want to mute.
-
Select More options
next to the student’s post, then Mute this person.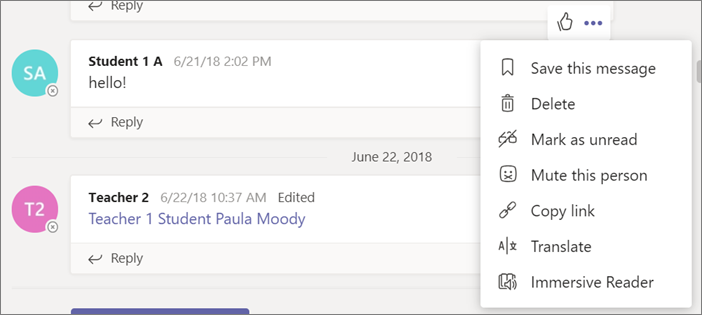
To un-mute the student, follow the instructions above in your class team settings.
-